Apples and butternut squash in the fall. Satsumas and brussel sprouts in the winter. Strawberries and asparagus in the spring. Peaches and tomatoes in the summer.
One of the best things about living in San Francisco is the accessibility of locally grown, fresh, seasonal fruits and vegetables year-round. In the city alone, there are 16 farmers’ markets (and counting) scattered throughout its tiny 7-by-7 square-mile grid. Throughout the past year, I blogged about how much I love spending weekend mornings in the city’s farmers’ markets, going home with a bagful of zebras and brandywines from the Ferry Plaza and with exciting finds like the locally grown sweet purple potatoes and champagne mangoes from Alemany.
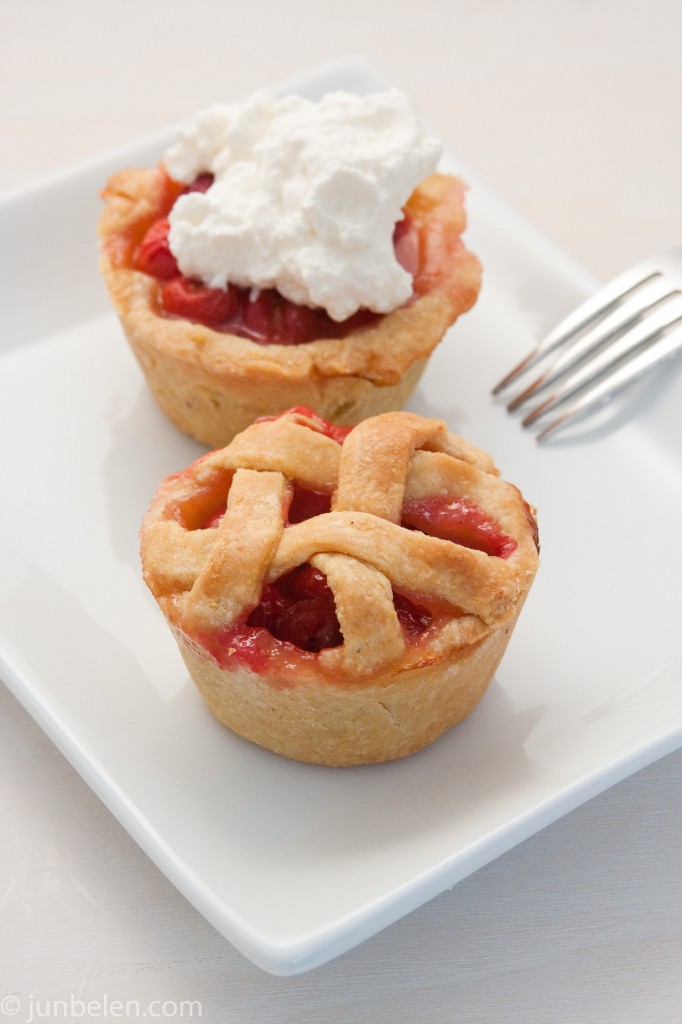
Last weekend, Dennis and I went to Alemany for our usual Saturday morning produce-shopping but with a major mission: to hunt for sour cherries. If purple yam and golden mangoes are sweet reminders of my childhood in Manila then red sour cherries are reminders of Dennis’ in Ohio. Growing up in Warren, Dennis recalls the three cherry trees they had in their backyard. Come summertime, he and his two older brothers, Tim and Brian, would climb up the trees, armed with ziploc bags, to pick cherries. On a really good year, they would happily return to the kitchen with bags and bags of red, juicy sour cherries. Their mom, Carol, who is an amazing baker, would then make sour cherry pie from scratch. For Dennis, a slice of pucker-inducing sour cherry pie with a dollop of whipped cream is the perfect summer treat.
And so while I was busy picking peaches, Dennis excitedly called me out after he spotted a big heap of bright red sour cherries, freshly picked from Hooverville Orchards in Placerville. We wrapped up our shopping spree and hurriedly drove back home to make his mom’s sour cherry pie. We had so much fun making ube baby pies that we decided to make sour cherry baby pies. We really loved the extra crunch of the cornmeal crust from our mango rhubarb pie and so we reprised it here. The cornmeal crust recipe was adapted from The Joy of Cooking. The recipes for making a whole pie and baby pies are slightly different. Here is a link to making whole sour cherry pies and just scroll down to get the recipe for the baby pies.
Sour Cherry Baby Pies Recipe
Recipe adapted from Irma Rombauer’s Cherry Pie from The Joy of Cooking, makes eight 5-inch baby pies
For the Cornmeal Pie Crust, makes one 9-inch double crust
1-3/4 cups all-purpose flour
3/4 cup yellow cornmeal
1/3 cup confectioner’s sugar
1-1/4 tsp salt
3/4 cup chilled lard or vegetable shortening
3 Tbsp cold unsalted butter
6 Tbsp ice water
For the Sour Cherry Pie Filling
1/2 cup sugar
1-1/2 Tbsp cornstarch
1/8 tsp salt
a pinch of ground cinnamon
1 tsp vanilla extract
1 tsp lemon juice
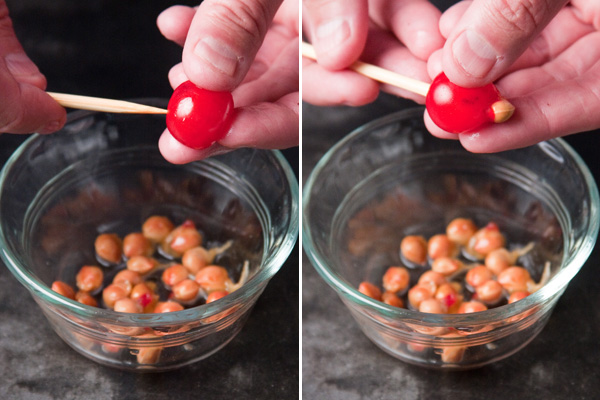
1 pound fresh sour cherries, pitted (about 6 cups)
1-1/2 Tbsp unsalted butter, cut into small pieces
1 medium egg, lightly beaten
Making the Dough
Preheat oven to 375 degrees. Place a sheet of foil at the bottom of the oven to catch any juices.
Sift together the flour, cornmeal, sugar and salt. Mix the chilled shortening and butter.
There are two steps in making pastry dough by hand. First, cut the fat into the dry ingredients and, second, bind the dough with water.
Cut half of the shortening mixture into the flour mixture with a pastry blender or work it in lightly with the tips of your fingers until it has the consistency of cornmeal. Work it in lightly and do not overwork the dough because it will become dense and greasy. Cut the second half of the shortening mixture into the dough until it is pea-sized. If you don’t have a pastry blender, you can use a fork. Leave it in firm, separate pieces, some fine and crumblike and the rest the size of peas.
Sprinkle the dough with ice water. Blend the water gently into the dough until it just holds together. You may lift the ingredients with a fork, allowing the moisture to spread. If necessary add another teaspoon to a tablespoon of ice water to hold the ingredients together. It is important to add only enough water to make the dough hold together but be careful not to put so much as to cause excessive gluten to develop, which would make the pie crust hard or chewy and breadlike. As a rule of thumb, the flour and fat mixture should be moistened only to the point where it forms small balls that hold together when pressed with your fingers.
Wrap the dough in plastic wrap and refrigerate. Chilling the dough up to 12 hours tenderizes it, helps keep it from shrinking during baking, and makes it easier to handle. If the dough has been chilled longer than 30 minutes, let it stand until it feels firm yet pliable, like modeling clay, when pressed. If it is too cold, the dough will crack around the edges when rolled.
Rolling the Dough
Roll out a little over half of the dough just like you would a regular pie. Roll the dough on a pastry cloth, pastry board, marble slab or on clean smooth countertop away from anything hot in your kitchen to avoid melting the fat. If the dough becomes too soft while rolling, loosen it from the work surface, slide a rimless cookie sheet beneath it, and refrigerate until it firms up.
Lightly flour the work surface and the dough. Roll the dough from the center out in all directions, stopping just short of the edge.
Check to make sure that the dough does not stick to the surface by sliding your hand beneath it. Scatter a little more flour on the work surface if it becomes too sticky. Rolling dough is like modeling clay. Seal cracks and splits by pushing the dough together with your fingers. Patch any holes, tears, or thin spots with dough scraps. Moisten one side with cold water and then firmly press them into place, with the moistened side down.
Shaping and Trimming the Dough
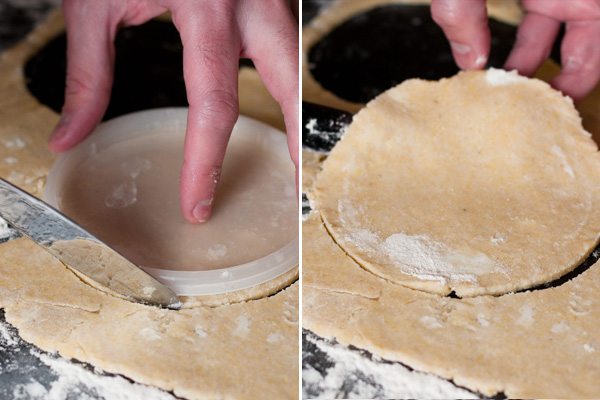
Cut 5-1/2- to 6-inch diameter circles using a paring knife and parchment paper (or a plastic container lid) as a guide. This size will give your baby pies a pretty little overhang on top.
Transfer the cut dough carefully into the pockets of a regular 12-cup muffin pan and press it firmly.
Making the Cherry Filling
Toss the fresh pitted cherries with vanilla and lemon juice. Combine sugar, cornstarch, salt, and cinnamon in a large bowl.
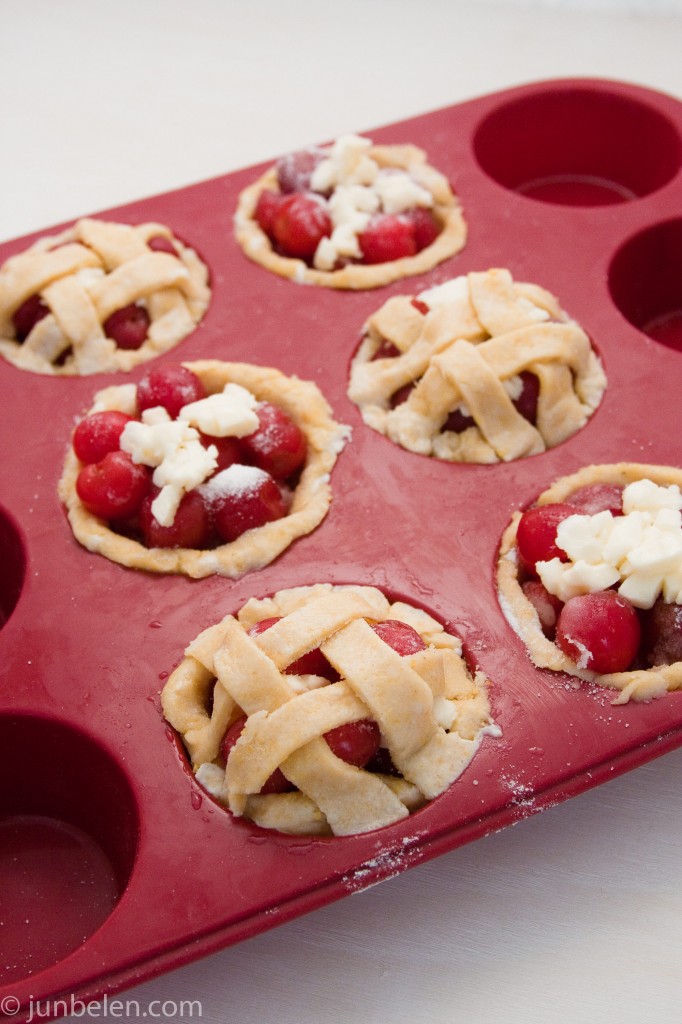
Into each baby pie, pour the cherry mixture until the pie is half full of cherries. Sprinkle a tablespoon of the sugar mixture over the cherries. Pour more of the cherry mixture until it heaps out of the pie slightly. Add another half a tablespoon of the sugar mixture. We divide the cherry and sugar mixture individually this way, instead of tossing the cherry and sugar together first, to make sure that each baby pie gets enough sugar. The sweetness of the pie can be adjusted by using more or less sugar.
Divide the butter cut up in small pieces evenly over the eight baby pies. Dot the top of each baby pie with butter.
Making the Lattice Top
Take leftover dough, ball it up, and roll it out. Cut 4-inch-long by 1/2-inch-wide strips for the lattice top. Lay four strips on top of each baby pie: two strips in one direction and two more in the perpendicular direction. Weave the two pairs to form a lattice. Moisten the ends of the lattice strips with a little water and attach them to the sides of the rim of the bottom crust. Brush the tops with lightly beaten egg.
Bake the baby pies until crust is golden brown and juices are bubbling. Start checking the pie after 20 minutes. Note that cherry juices may spill out of the pies, which is the reason for placing a sheet of foil at the bottom of the oven. Let the pie cool slightly on a wire rack. The pie can be stored at room temperature for up to a day.
Enjoy the baby pies with a dollop of freshly whipped cream, a scoop of creamy vanilla ice cream or simply by its pucker-inducing self.
For the Cornmeal Pie Crust, makes one 9-inch double crust
1-3/4 cups all-purpose flour
3/4 cup yellow cornmeal
1/3 cup confectioner’s sugar
1-1/4 tsp salt
3/4 cup chilled lard or vegetable shortening
3 Tbsp cold unsalted butter
6 Tbsp ice water
For the Sour Cherry Pie Filling
1 cup sugar
3 Tbsp cornstarch
1/4 tsp salt
1/8 tsp ground cinnamon
1 tsp vanilla extract
1 tsp lemon juice
2 pounds fresh sour cherries, pitted (about 6 cups)
2 Tbsp unsalted butter, cut into small pieces
1 large egg, lightly beaten
Making the Dough
Preheat oven to 375 degrees. Place a sheet of foil at the bottom of the oven to catch any juices.
Sift together the flour, cornmeal, sugar and salt. Mix the chilled shortening and butter.
There are two steps in making pastry dough by hand. First, cut the fat into the dry ingredients and, second, bind the dough with water.
Cut half of the shortening mixture into the flour mixture with a pastry blender or work it in lightly with the tips of your fingers until it has the consistency of cornmeal. Work it in lightly and do not overwork the dough because it will become dense and greasy. Cut the second half of the shortening mixture into the dough until it is pea-sized. If you don’t have a pastry blender, you can use a fork. Leave it in firm, separate pieces, some fine and crumblike and the rest the size of peas.
Sprinkle the dough with ice water. Blend the water gently into the dough until it just holds together. You may lift the ingredients with a fork, allowing the moisture to spread. If necessary add another teaspoon to a tablespoon of ice water to hold the ingredients together. It is important to add only enough water to make the dough hold together but be careful not to put so much as to cause excessive gluten to develop, which would make the pie crust hard or chewy and breadlike. As a rule of thumb, the flour and fat mixture should be moistened only to the point where it forms small balls that hold together when pressed with your fingers.
Divide the dough in half, shape each into a disk, wrap in plastic wrap and refrigerate. Chilling the dough up to 12 hours tenderizes it, helps keep it from shrinking during baking, and makes it easier to handle. If the dough has been chilled longer than 30 minutes, let it stand until it feels firm yet pliable, like modeling clay, when pressed. If it is too cold, the dough will crack around the edges when rolled.
Rolling the Dough
Roll the dough on a pastry cloth, pastry board, marble slab or on clean smooth countertop away from anything hot in your kitchen to avoid melting the fat. If the dough becomes too soft while rolling, loosen it from the work surface, slide a rimless cookie sheet beneath it, and refrigerate until it firms up.
Lightly flour the work surface and the dough. Roll the dough from the center out in all directions, stopping just short of the edge.
Check to make sure that the dough does not stick to the surface by sliding your hand beneath it. Scatter a little more flour on the work surface if it becomes too sticky. Rolling dough is like modeling clay. Seal cracks and splits by pushing the dough together with your fingers. Patch any holes, tears, or thin spots with dough scraps. Moisten one side with cold water and then firmly press them into place, with the moistened side down.
Shaping and Trimming the Dough
Roll the dough into a circle roughly 3 to 4 inches larger than your pan to allow plenty of dough for a rim. The best way to make sure that you rolled the right size is by inverting the pie pan and placing it in the center of the rolled dough. Transfer the rolled dough carefully into the pan and press it firmly into the pan. Trim the edges of the dough with a pair of scissors or a small pairing knife, leaving a 3/4-inch overhang.
Making the Cherry Filling
Toss the fresh pitted cherries with vanilla and lemon juice.
Combine sugar, cornstarch, salt, and cinnamon in a large bowl. Add the cherries, and toss. Pour cherry mixture into prepared pie plate. Dot the top with butter. Lightly brush exposed edge of crust with egg.
Making the top crust
Roll the other half of the dough to make the solid top crust. Cut the rolled dough 1 inch larger than the pan.
Brush the overhang edge of the bottom crust with cold water. Place the top crust over the pie. Firmly pinch the edges of both crusts to seal. Trim the edge of both crusts to a 3/4-inch overhang then tuck the overhang underneath itself so that the folded edge is flush with the rim of the pie pan. To allow the steam to escape during baking, using a sharp paring knife, make three or four 2-inch vents in the top crust.
Lightly brush the top crust with milk or cream and sprinkle with sugar.
Bake the pie until crust is golden brown and juices are bubbling. Start checking the pie after an hour. Let the pie cool slightly on a wire rack. The pie can be stored at room temperature for up to a day.


