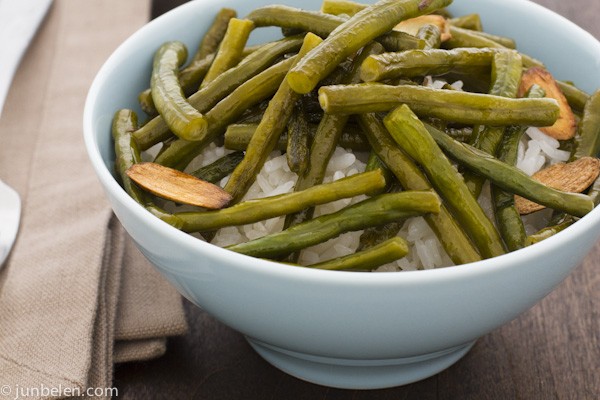
Shopping for Char Siu in Chinatown

February 10, 2010 junbelen Leave a comment

Share/Bookmark

Shopping in Chinatown is always an adventure.

Chinatown San Francisco

The oldest in North America and one of the largest outside China, Chinatown is undoubtedly one of the most fascinating neighborhoods in the city.

The adventure starts once you get on the 30 en route to Stockton where you’ll be greeted by an energetic mob of Chinese ladies eager to get the best seat on the bus. It starts to feel distinctively Chinese once the bus maneuvers its way through Union Square and goes through the Broadway tunnel. And once you step off the bus at Stockton, you’ll definitely feel you have entered an entirely different world.

I had two things I wanted to buy last Wednesday: some char siu and a bamboo steamer. I was going to make my very first char siu bao, buns filled with barbecue flavored char siu pork.  The buns can be either steamed or baked but I was going to steam them so I was also on the lookout for a bamboo steamer. Crate & Barrel downtown carries bamboo steamers but I wanted to get one from an Asian store and, besides, I was certain I could get a cheaper one in Chinatown.

I intentionally did not have a solid plan on where to get the two items in my shopping list. I guess that was part of the fun. I had just one thing in mind, I was going to rely on people I meet on the street to give me the leads. So where did I start? I was a bit hungry for a snack and went straight to Golden Gate Bakery.

Chinese Sweet Treats at Golden Gate Bakery

They have the tastiest Chinese sweet treats this side of town, from yummy deep fried sesame balls to creamy custard tarts. I grabbed my flaky melon cake wrapped in a brown paper bag and a tip to go to Yee’s Restaurant a block away along Grant Avenue for some char siu pork.

Shopping for Char Siu in Chinatown

A true Chinese hole-in-the-wall with take out, Yee’s has everything from roasted duck, chicken, and goose to barbecued pork. A half a pound of char siu for less than 4 bucks was the deal of the day. The friendly butchers at Yee’s then referred me to Ginn Wall Hardware Company down the street for my bamboo steamers.  The plan was working out.

I got so excited when I saw the bamboo steamers all lined up in the store’s window display but got so disappointed when I found out that the hardware is closed on Wednesdays! After checking out five other Chinese bazaars along Grant Avenue that carried steamers that were either too big or too small, I started to get a little frustrated. I’m in Chinatown! They should have steamers in every corner, I thought. But I finally stumbled upon The Wok Shop where I got myself a sturdy 8-inch bamboo steamer. It was exactly what I wanted.

Chinatown San Francisco

With char siu pork in one hand and bamboo steamer in the other, I was ready to go home and make some yummy char siu bao. I looked up, admired the beautiful red Chinese lanterns and noticed that it was laundry Wednesday.

Laundry day in Chinatown

Share/Bookmark

Here is more information about the restaurants and shops mentioned in this blog.

Golden Gate Bakery
1029 Grant Ave between Jackson Street and Pacific Avenue
San Francisco, CA 94133
415.781.2627

Yee’s Restaurant
1131 Grant Ave between Pacific Avenue and Jack Kerouac Alley
San Francisco, CA 94133
415.576.1818

Ginn Wall Hardware Company
1016 Grant Avenue between Jackson Street and Pacific Avenue
San Francisco, CA 94133
415.982.6307

The Wok Shop
718 Grant Avenue between Commercial Street and Sacramento Street
San Francisco, CA 94108
415.989.3797
www.wokshop.com

How to Make Chocolate Cake with Chocolate and Peanut Butter Frosting

February 7, 2010 junbelen 1 comment

Share/Bookmark

True to Dennis’s genuine love for all things chocolate and all things peanut butter, we made a chocolate cake with chocolate and peanut butter frosting for his birthday.

Okay, I’m actually using the pronoun “we” here very loosely.  It was more like “he” rather than “we”.  Dennis made his first two-layer chocolate cake from scratch and I was the assistant pastry chef and food stylist.  We used a basic chocolate cake recipe from Alice Waters’s The Art of Simple Food and a chocolate butter icing recipe from The Joy of Cooking.  We tweaked the icing recipe a little to make a decadent chocolate and peanut butter frosting instead.  The chocolate cake recipe is a great versatile recipe that can be used to make cakes in any format from sheet cakes to cupcakes.

Chocolate Cake with Chocolate and Peanut Butter Icing

For the chocolate cake, makes one 9-inch one-layer or multilayer round cake

4 oz unsweetened chocolate
2 cups cake flour
2 tsp baking soda
1/2 tsp salt
6 Tbsp cocoa powder
8 Tbsp (1 stick) butter, softened
2-1/2 cups brown sugar
2 tsp vanilla extract
3 eggs, at room temperature
1/2 cup buttermilk, at room temperature
1-1/4 cups boiling water

For the chocolate and peanut butter frosting, makes two cups of frosting

4 oz unsweetened chocolate, coarsely chopped
3 Tbsp unsalted butter
1/4 cup milk
1/2 cup peanut butter
1 tsp vanilla extract
3 cups confectioners’ sugar, sifted

Making the cake

Preheat the oven at 350 degrees F.

Butter two 9-inch cake pans and line the bottom with parchment paper. Butter the paper and dust the pan with flour or cocoa, and shake out the excess. Lining the pan with parchment paper makes removing the cake from the pan much easier.

Coarsely chop the unsweetened chocolate.  We used the Venezuelan chocolate El Rey Bucare that has 58.5% cocoa.  Place the coarsely chopped chocolate in a metal bowl and set the bowl over a pot of simmering water. The metal bowl should be big enough so that it sits on top of the pot without touching the water.

Melting Chocolate in a Metal Bowl over a Pot of Simmering Water

Turn off the heat. Stir the chocolate from time to time until completely melted and smooth. Remove the bowl from the pot and set aside the melted chocolate.

Melting Chocolate in a Metal Bowl over a Pot of Simmering Water

Sift together the cake flour, baking soda, salt, cocoa powder.

In a large bowl, beat the softened butter until creamy. Beat the butter either by hand or in a stand mixer. Beat in the brown sugar and vanilla extract. Then beat in the eggs, one egg at a time. When fully blended, stir in the melted chocolate. Add half of the dry ingredients to the mixture and combine. Stir in the buttermilk. Then stir in the rest of the dry ingredients. Gradually pour in the boiling water until completely blended. The batter will have a thin liquid consistency.

Pour the batter equally into the two cake pans and bake for 45 minutes or until a toothpick inserted into the center comes out clean. Place the pan on a cooling rack and allow the cake to cool completely.

Baking the Chocolate Cake

Run a knife around the edge of the pan to loosen the cake. Remove the cake from the pan and peel off the parchment paper. The cooled cake can be kept in the pan and stored if you are not using the cake the same day. Just make sure that it is tightly covered.

The recipe can also be used to make a sheet cake or cupcakes. For a sheet cake, prepare a half-sheet pan as mentioned above. Pour the batter, smooth the top, and bake for about 20 minutes. For cupcakes, bake for about 30 minutes. The recipe makes around 24 individual cupcakes.

Making the icing

Melt the chocolate the same way as previously. Place the coarsely chopped chocolate in a metal bowl and set the bowl over a pot of simmering water. Remove from heat. Add the unsalted butter, stir in the milk and the vanilla extract. Blend by hand or use a stand mixer. Gradually add the confectioners’ sugar and beat until smooth and spreadable. Add the peanut butter and mix until well blended.

Add more sugar, if needed, to thicken the consistency. According to the Joy of Kitchen, confectioners’s sugar icings tend to thicken on its own if left undisturbed for a few minutes. Also, it thickens if stirred over a bowl of ice water. Add more peanut butter if you prefer a more peanut buttery taste.

Make the icing just before using.

Assembling the Cake

Place the first layer on a cake pedestal. Using a carving knife, trim the top of the first layer to make it flat.

Assembling the Chocolate Cake

Evenly spread a generous layer of the icing on top of the cake using a metal spatula. Then place the second layer on top of the frosting.

Chocolate Cake with Chocolate and Peanut Butter Frosting

Generously coat the cake with the frosting using a metal spatula. The recipe for the frosting makes 2 cups, which we found to be just enough for a two-layer 9-inch cake.  If you prefer a cake more lavishly coated with frosting, adjust the ingredients proportionally to yield more.

The cake was amazing.  Rich and moist.  Dennis’s birthday, too was equally amazing.  Sweet sixteen. :-)

Share/Bookmark

Chocolate Cake with Chocolate and Peanut Butter Icing

How to Make Bacon Snickerdoodles

February 3, 2010 junbelen 3 comments

Share/Bookmark

Inspired by Kitchenette’s delightful bacon snickerdoodles, I solicited the help of the Joy of Cooking for a basic snickerdoodle recipe and tweaked it a bit to accommodate the addition of some tasty salty bacon.

Bacon Snickerdoodles

For the dough, makes eighteen 3-inch cookies

1 cup all-purpose flour
1 tsp cream of tartar
1/2 tsp baking soda
1/8 tsp salt
6 Tbsp unsalted butter, softened
3/4 cup sugar
1 egg

For the cinnamon-sugar coating

1/8 cup sugar
2 tsp ground cinnamon

And of course, don’t forget the bacon.  A few strips will do.

Mix thoroughly the dry ingredients: flour, cream of tartar, baking soda and salt in a small bowl until well blended.

Using a wooden spoon, mix thoroughly the softened butter and sugar in a large bowl until it becomes a well blended paste. Add the egg and mix until well combined. Stir in the flour mixture. Stir it in incrementally so you won’t have flour all over the place. Mix thoroughly and set aside.

In a small bowl, combine the sugar and cinnamon for the coating.

Slice the bacon strips widthwise into 1/2-inch wide slices.

Shape the dough into 1-1/4-inch balls.  It’s a bit sticky so I ended up scooping the dough with a spoon instead of shaping it by hand.  Roll them in the cinnamon-sugar coating, and arrange about 2-3/4 inches apart on the cookie sheets. Place the bacon slices on top of each ball, right in the middle. Gently press down the bacon. This will flatten the dough a bit, but just a tiny bit.  Doing this makes sure that the bacon stays in the middle of the cookie as it bakes.  The first time I tried baking these cookies, I just laid the bacon strips on top of the dough without pressing it down gently. The bacon did not stay in the center and it flowed toward the edge of the cookie as it baked.

Bacon Snickerdoodles

Bake one sheet at a time, until the cookies are light golden brown at the edges, 12 to 14 minutes. Let the cookies stand briefly then place them on racks to cool.

Just a word of caution, they are truly addicting. It’s the sweetness of the cookie combined with the saltiness of the bacon that I love so much.

Share/Bookmark

How to Make Polpette at Home

February 2, 2010 junbelen 4 comments

Share/Bookmark

Polpette is Italian meatballs.

Generally made with beef and pork, combined with some olive oil, garlic, cheese, bread crumbs, egg and parsely and rolled by hand, polpette can be easily made at home.  Toss them with tomato sauce and spaghetti to make the beloved American favorite, spaghetti with meatballs.  Or grab some crusty bread to make a hearty meatball sandwich. Or simply roll them in grated or shredded Parmesan cheese and serve them as an hors d’oeuvre or even a main course.

Homemade Polpette

This Italian meatball recipe is taken from Alice Waters’s The Art of Simple Food.

Making Polpette

1 pound ground grass-fed beef
3/4 pound ground pork shoulder
1 cup torn-up pieces of day-old white bread with crusts removed
1/2 cup milk
1 small yellow onion
1 Tbsp olive oil
2 garlic cloves, peeled and pounded to a paste
1 Tbsp chopped fresh oregano (or 1 tsp dried oregano)
1 Tbsp chopped parsley
1 egg
1/4 cup grated or shredded Parmesan cheese
a pinch of cayenne pepper
salt and fresh-ground pepper

Season the ground beef and ground pork with salt and fresh-ground black pepper.

In a small bowl, combine the bread pieces and milk. Set aside to soften. Grate the onion using the large-holed side of a box grater or if you don’t have a grater, chop the onions very finely until it becomes a rough puree, which will add moisture on top of flavor to the meatballs. Squeeze most of the milk out of the bread and put the bread in a large mixing bowl together with the seasoned meat and the grated onion.

Add the rest of the ingredients and mix them with your hands gently and thoroughly. Mixing them too much makes the meatballs tough. Fry a little meatball in a small pan and taste. Adjust the salt and pepper as needed. If it seems a bit dry, add a little milk. Gently roll the mixture into golf-size meatballs by hand.

Preheat the oven to 450 degrees F and bake the meatballs on a rimmed baking sheet until just cooked through. Waters suggests a baking time of about 6 minutes. When I made mine, I baked for 8 minutes and then turned up the broiler and broiled the meatballs for another 2 minutes to brown them a bit. An alternative to baking is frying the meatballs in little oil in a pan, turning them occasionally for even browning. I personally prefer baking since I find it hard to brown the meatballs uniformly by frying them.

Waters suggests the following cool variations.

  • Use ground turkey instead of ground beef.
  • Use cold cooked rice or potato instead of the bread.
  • Add other chopped herbs such as mint, marjoram, sage or thyme.

Share/Bookmark

Homemade Polpette with Spaghetti

Tasty Kitchenette Lunches in the Dogpatch

February 1, 2010 junbelen 2 comments

Kitchenette is one of the many cool things about the Dogpatch.

Across the street from the old warehouses in Pier 70, Kitchenette serves tasty lunches out of a garage door along Illinois Street. Run by chefs who have worked with the likes of Thomas Keller and Alice Waters, the food is organic, local and delicious.

Kitchenette's Pastrami Sandwich

I’ve had memorable lunches at Kitchenette since we moved to the Dogpatch.   Their house smoked pastrami sandwich (Marin Sun Farms beef smoked over fig wood with apple-caraway mustard and braised cabbage) and their beef and pork polpette sandwich (meatballs in amatriciana sauce with parmesan cheese) are really yummy.

Kitchenette's Polpette Sandwich

But the most memorable by far is their bacon snickerdoodle.  I think it’s genius. It’s an excellent example of how bacon can make anything, like a simple snickerdoodle, extra special.

Kitchenette's Bacon Snickerdoodle

Kitchenette’s lunch-to-go menu changes everyday, so its best to check out what’s for lunch the day before on their blog and tweets.  They are cash only.

Crabs in Clement and Crab Cakes in the Castro

January 28, 2010 junbelen Leave a comment

Where do you get Dungeness crabs in the city?

The first place that comes to mind is, obviously, Fisherman’s Wharf teeming with seafood street vendors and restaurants.   But the Wharf gets extremely crowded most of the time unless you go on a rainy weekday.  A great alternative is the city’s Asian supermarkets.  There’s certainly Chinatown, but there are two new cool neighborhood discoveries I recently made: Clement Street in Inner Richmond and Manila Oriental Market in Excelsior.  Start at Clement and Arguello, walk westward down Clement and you’ll hit a goldmine of all things Asian.  And there’s Manila Oriental Market along Mission Street in Excelsior, a place that definitely reminds me of home with aisle after aisle of Asian goodies like oyster sauce, tapioca starch, bibingka mix, dumpling wrappers, saba bananas, fresh whole fish and, of course, live crabs.

Manila Oriental Market in Excelsior

And if you feel like indulging in Dungeness crab cakes but don’t have the luxury of time to make them, where do you go for crab cakes in the city?

Here’s another surprising discovery: the Castro.  Instead of taking the cable car to Fisherman’s Wharf, hop on the Muni and head over to the Castro and enjoy delicious crab cakes either at Woodhouse Fish Company along Market Street or Anchor Oyster Bar along Castro Street.  Their cakes are fresh and tasty.

Crab Cakes at Woodhouse Fish Company

Here are more information about the supermarkets and restaurants mentioned in this blog.

Where to buy Dungeness crabs

Wing Hing Seafood Market
633 Clement St between 7th Avenue and 8th Avenue
San Francisco, CA 94118
415.668.8986

Richmond New May Wah Superemarket
707-719 Clement Street and 8th Aveue
San Francisco, CA 94118
415.221.9826

Manila Oriental Market
4175 Mission St between Ney and Trumbull Streets
San Francisco, CA 94112
415.337.7272

Where to enjoy Crab Cakes

Woodhouse Fish Company
2073 Market St between 14th and Reservoir Streets
San Francisco, CA 94114
415.437.2722

Anchor Oyster Bar
579 Castro St between 18th and 19th Streets
San Francisco, CA 94114
415.431.3990

How to Make Dungeness Crab Cakes at Home

January 26, 2010 junbelen 1 comment

It’s Dungeness crab season in San Francisco and there’s no better way to enjoy these tasty crustaceans than to make crab cakes! Alice Waters has a great simple recipe for crab cakes in her amazing book The Art of Simple Food.

Making homemade crabcakes is an excellent example of why homecooking is so cool: you actually know what ends up in your plate because you made it yourself.  Most of the time I wonder how much crabmeat there is in the crab cakes I get when I dine out.  Get the best crabmeat, pick the freshest herbs, make your own breadcrumbs and if you’re a little adventurous, make your own mayonnaise from scratch! Fresh ingredients plus a simple recipe equals great-tasting food.

Crab Cakes

1 lb crabmeat (picked from 2 Dungeness crabs)
1 cup mayonnaise
2 Tbsp chopped chives
2 Tbsp chopped parsley
2 Tbsp chopped chervil
1 Tbsp fresh lemon juice
salt and cayenne to taste
1-1/2 cups breadcrumbs (click here to learn how to make fresh breadcrumbs)
5 Tbsp unsalted butter (click here to learn how to make clarified butter)

Cooking the crabs

Boil salted water in a large pot and then carefully drop in the Dungeness crabs. Two Dungeness crabs will yield roughly a pound of crabmeat but use as many blue crabs or other crabs as needed to yield the same.  Boil for 15 minutes.  Remove the crabs from the pot and let them drain and cool.

Pull off the large top shell, remove the fibrous lungs and rinse lightly.

Cracking the Crab Open

Split the main body in half down the center.  Pull off the legs, crack them, and pick the crabmeat from the body and legs.  Big chunks of crabmeat are good for texture. Put the crabmeat in a bowl and gently go through the meat to remove any bits of shell left in the meat.  Refrigerate until ready to use.

Picking the Crabmeat

Making the cakes

Stir the chives, parsley, chervil, lemon juice, salt and cayenne into the mayonnaise and mix thoroughly.  Let me make a note that chervil is pretty difficult to find. Even the local Whole Foods does not normally carry them.  If you find yourself chervil-less, don’t worry I think you’ll be fine without it.

Stir the mayonnaise into the crabmeat, mix gently but thoroughly. Taste and add more lemon juice and salt as needed. Form the mixture into patties. I ended up making six 3-inch diameter cakes.  Roll the patties to coat in the breadcrumbs.

Forming the Patties

Warm a heavy-bottomed pan over medium heat.  Pour in the clarified butter (click here to learn how to make clarified butter) and when the butter is hot, carefully add the crab cakes and fry until golden brown, about 4 minutes on each side. If the breadcrumbs start to burn, turn down the heat.

Simple Crabcakes

A cool variation to this dish is to use fish fillet to make fish cakes.  Waters recommends using a firm white fish like halibut, haddock or ling cod.  Use two cups of chopped fish fillet in place of the crabmeat.

How to make fresh bread crumbs

Breadcrumbs are best made from bread that has been dried out for a day or two.  For breading and frying, Waters recommends using white bread.  First, remove the crust. Cut the crustless bread into cubes and grind up the bread in batches using a food processor or a blender.  The bread should be ground up thoroughly so the crumbs are more or less the same size.  Crumbs for breading need to be ground very fine, so they will stick to and evenly coat whatever is being breaded.

How to make clarified butter

Melt unsalted butter in a small heavy pot over medium heat.  Cook the butter until it has spearated and the milk solids are just turning a light golden brown.  Pour through a fine strainer to remove the milk solids.

Brining Chicken Thomas Keller-Style

January 21, 2010 junbelen Leave a comment

Brining is an amazing tool to cure meats and to season them uniformly.  Here is Thomas Keller’s recipe for chicken brine that you can use for roasting or frying chicken.

Chicken Brine Thomas Keller-Style

The key ingredient is lemon, which goes wonderfully well with chicken. Adding the herbs: bay leaf, parsley and thyme gives the chicken a wonderful aromatic flavor.

The recipe makes 2 gallons of brine which is enough for 10 pounds of chicken.  This  may be a bit much for a single person, a couple, or a small family.  I recommend either brining a big batch and freezing the brined chicken that you won’t use or simply dividing the recipe accordingly depending on how much chicken you are going to cook.

5 lemons, halved
24 bay leaves
1 bunch (4 ounces) flat-leaf parsley
1 bunch (1 ounce) thyme
1/2 cup honey
1 head garlic, halved through the equator
1/4 cup black peppercorns
1 cups (10 ounces) kosher salt
2 gallons water

Combine all the ingredients in a large pot, cover, and bring to a boil. Boil for 1 minute, stirring to dissolve the salt. Remove from the heat and cool completely, then chill before using. The brine can be refrigerated for up to 3 days.

Pour the brine into a container large enough to hold the chicken pieces, add the chicken, and refrigerate for 12 hours. The chicken may be too salty if you brine the chicken for more than 12 hours.

Remove the chicken from the brine, rinse with cold water, pat dry with paper towels and let it rest at room temperature for over an hour. Roast or fry the chicken.

Here is Thomas Keller’s recipe for his amazing Buttermilk Fried Chicken.

How to Make Ad Hoc Fried Chicken At Home

January 20, 2010 junbelen 6 comments

Share/Bookmark

Driving home from Napa, still under the spell of the best fried chicken I have ever had, I started planning on recreating Thomas Keller’s famed fried chicken. There are two things that set Keller’s fried chicken apart from the rest.  First, the chicken is brined for 12 hours in a herb-lemon brine, which seasons the meat and makes it moist and juicy.  The key ingredient is lemon, which goes wonderfully with chicken.  And second, the chicken is dredged in flour seasoned with garlic and onion powders, paprika, cayenne, salt and pepper, then dipped in buttermilk and then dredged again in the flour.

The following day I bought myself a copy of Ad Hoc At Home and then assembled the ingredients for my very first homemade Ad Hoc fried chicken.

Buying and Brining the Bird

The recipe calls for 2-1/2 to 3 pound chickens. As Keller suggests, cooking smaller chickens, typically found in farmers’ markets and smaller grocery stores, gives the optimum meat-to-crust proportion, which is critical to excellent fried chicken.

Cut the whole chicken into 10 pieces: 2 legs, 2 thighs, 4 breast quarters, and 2 wings. Keller is a huge advocate of buying whole chickens.  It’s a way to become more intimate with the act of cooking, he says and I agree.  For those who have not attempted  to cut a whole chicken before, let me forewarn you: it is not easy.  But I guess like anything else, practice makes perfect.  For the faint of heart, you can always buy a whole chicken and have it butchered before taking it home.

10 Piece Chicken Cut

For the Chicken Brine

5 lemons, halved
24 bay leaves
1 bunch (4 ounces) flat-leaf parsley
1 bunch (1 ounce) thyme
1/2 cup honey
1 head garlic, halved through the equator
1/4 cup black peppercorns
1 cups (10 ounces) kosher salt
2 gallons water

Ingredients for Chicken Brine

Combine all the ingredients in a large pot, cover, and bring to a boil. Boil for 1 minute, stirring to dissolve the salt. Remove from the heat and cool completely, then chill before using. The brine can be refrigerated for up to 3 days.

The recipe makes two gallons of brine that is good for 10 pounds of chicken (3 to 4 whole chickens), which may be a bit much for a single person, a couple or a small family.  I recommend either brining a big batch and freezing the brined chicken that you won’t use or simply dividing the recipe accordingly depending on how much chicken you are going to cook.  I made fried chicken using a single 3-pound chicken and ended up using 1/3 of the amount of each ingredient and it worked fine.  The important thing to remember is to keep the proportions intact.

Pour the brine into a container  large enough to hold the chicken pieces, add the chicken, and refrigerate for 12 hours.  The chicken may be too salty if you brine the chicken for more than 12 hours.

Remove the chicken from the brine, rinse with cold water, pat dry with paper towels and let it rest at room temperature for over an hour.

Dredging and Frying the Bird

Keller recommends peanut oil for deep frying, which I found to be rather elusive when I was shopping for groceries.  I ended up using canola oil, which he, likewise, recommends.  Fill the pot with at least 2 inches deep of oil and heat to 320 degrees F.  If you have the luxury of two large pots and a lot of oil, you can cook the dark meat in one pot and white meat in another pot.  Otherwise, cook the dark meat first, then turn up the heat and cook the white meat.  Note that the oil should not come more than 1/3 of the way up the sides of the pot.

For Dredging and Frying

1 quart buttermilk
Kosher salt and freshly ground pepper
peanut or canola oil

For the Coating

6 cups all purpose flour
1/4 cup garlic powder
1/4 cup onion powder
1 Tbsp plus 1 tsp paprika
1 Tbsp plus 1 tsp cayenne
1 Tbsp plus 1 tsp kosher salt
1 tsp freshly ground pepper

Combine all the ingredients in a large bowl. Again the coating recipe is good for a large batch. For frying just a single 3-pound chicken, I found that using 1/3 of the amount of each ingredient is more than sufficient. Do not be too consumed about measuring the right amount of spices. Feel free to experiment and use the recipe just as a guide.

Transfer half the coating to a second large bowl. Pour the buttermilk on a third bowl and season with salt and pepper. Set up a dipping station: the chicken pieces, one bowl of coating, the bowl of buttermilk, and the second bowl of coating.

Fried Chicken Dipping Station

Start with the chicken thighs.  Just before frying, dip the chicken thighs into the first bowl of coating, turning to coat and patting off the excess.  Dip them into the buttermilk, then dip into the second bowl of coating.  Carefully lower the thighs into the hot oil.  Adjust the heat as necessary to keep the temperature of the oil at 320 degrees F.  Turn the chicken pieces carefully around in the oil and monitor the temperature.  Fry until the chicken is deep golden brown in color, cooked through and very crispy.  The recipe recommends 11 to 12 minutes of frying but, seriously, one important thing I realized is that if you follow the recipe (or any recipe for that matter) to the dot and you get too consumed about details you end up burning the chicken!  Frying for 11 to 12 minutes is not set in stone.  The deep golden brown color, I think, is a better gauge of completeness.

Keller recommends skimmers and spiders instead of tongs when handling the chicken pieces.  Lifting food from below, rather than pinching onto it, allows you to work the food gently.

Using Spiders Instead of Tongs when Making Fried Chicken

Transfer the fried thighs to a cooling rack skin-side-up to allow excess fat to drain.  Make sure that the oil is at 320 degrees F.  Coat and fry the chicken drumsticks.  Turn up the heat and set the oil temperature to 340 degrees F.  Coat and fry the chicken breast and wings.  Make sure to carefully lower the chicken pieces into the hot oil and fry until golden brown and cooked through.

Arrange the chicken on a serving platter.  Add rosemary and thyme sprigs to the oil, which will still be hot and you’ll know what I mean when you drop the herb sprigs in the hot oil.  Let them cook and crisp for a few seconds and use them to garnish your chicken.

A final Keller note is that they let the chicken rest for 7 to 10 minutes after it comes out of the fryer.  If the chicken has rested longer than 10 minutes, keep the chicken in a 400 degree F oven for a minute or two to ensure that the skin is crisp and the chicken is hot.

I love fried chicken.  I really do.  The recipe sounds a bit complicated but you’ll be rewarded with genuinely tasty fried chicken.

Share/Bookmark

Ad Hoc Fried Chicken Made at Home

Ad Hoc Fried Chicken Night

January 19, 2010 junbelen 2 comments

Share/Bookmark

I have found the best fried chicken.

Ad Hoc Fried Chicken

It’s in Yountville in Napa Valley fifty miles north of the Golden Gate.   It’s served every other Monday night in Thomas Keller’s amazing Ad Hoc. The fried chicken is by far the best I have had.  The skin is crispy, the meat is moist, the chicken is perfectly fried with an incredible aromatic flavor, which I was told comes from lemons, the key ingredient used in the chicken brine.  They brine their chicken overnight before they are coated in buttermilk and spices and then deep fried.

Ad Hoc offers a topnotch 4 course family style menu that changes everyday using the freshest, local and seasonal ingredients.  The wine list is accessible and outstanding.  The staff is accommodating and friendly.  The dining room is casual yet elegant: hardwood floors with tables lined with a metallic top that beautifully reflects the light toward the ceiling.  Our dining experience truly reminded us of the warmth of dining at home.

The buttermilk fried chicken was amazing but there were also other noteworthy highlights throughout the evening.

Ad Hoc Salad Course, Mixed baby Greens

Our fried chicken night started with a salad of baby mixed greens: living watercress, shaved brussels sprouts, 
red radish, nantes carrots, polenta croutons
 and sweet fennel vinaigrette.  The greens with a light drizzle of the sweet fennel vinaigrette was refreshing but the real star of this dish is the polenta croutons, which is simply fried polenta, a delightful discovery.

The chicken was served family-style with roasted cauliflower and carolina gold rice, hot smoked pork and 
cranberry beans.  The roasted cauliflowers came with 
capers, golden raisins, and pine nuts.  The dish was so simple yet so delicious.  And the rice, pork and beans dish was amazing as well.

Ad Hoc Roasted cauliflower with Capers, Pine Nuts and Raisins

Ad Hoc Rice, Pork and Beans

The cheese course was Pedrozo Dairy Northern Gold
 with sweet butternut quickbread.  And a trio of cupcakes, devil’s food, lemon curd, red velvet nicely capped off the evening.

Ad Hoc Trio of Cupcakes

Ad Hoc is an hour and a half away from the city but saying that it’s well worth the drive is seriously an understatement.  I highly recommend the place to both locals and visitors alike.

Fried chicken night is every other Monday night.  You can check out Ad Hoc’s daily menu at their site to find out what’s for dinner.

Share/Bookmark